A Beginners guide to using Ableton Live
Ableton Live has proven to be an excellent choice for musicians and producers alike. Don’t be fooled by it’s simplicity. Ableton Live is one of the best DAW on stage as well as in the studio. My personal opinion of coarse:) Over the past 5 years it has basically risen to the top of pro music software.
I’ve put this post together to help those who haven’t really used the program. As well as for those of you who just want to beef up your skills a little.
- SETTING UP YOUR AUDIO INTERFACE: – Ableton Live Tutorial –
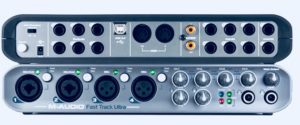 After choosing your preferred audio interface, you will need to connect the device to your computer system. The external audio interface allows you to connect to microphones, instruments and other real sound systems so that you can record them into Ableton live. You can actually use live without an external audio interface but with some limitations. This is because the external audio interface generally improves sound quality in your computer as well as gives you more options such as multiple inputs and outputs as well as record monitoring capabilities.
Most external audio interface use USB to connect to your computer. I hope you’re using a usb3.0, firewire, or lighning cables. These type of connections are preferred although there are many audio interfaces that will work fine on usb 2.0. Plug the narrow square side of your USB into the port on your interface, and the wide size into a USB port on your computer. Now launch live and open live’s preferences from the live menu on the Mac or the options menu on the PC and click the audio tab. In the driver type chooser, select the driver type for your interface if not already selected.
On a MAC, choose ‘CoreAudio’, on a PC choose ASIO. If these options aren’t available, you probably need to install driver software before you can use your interface. Make sure you install the latest drivers for your audio interface. With some computers, you may need to restart live or your computer after installing the drivers. Check the instructions that came with your interface to learn more.
For PC users who don’t have any external audio interface and have to use their onboard soundcards, it is highly recommended that you download and install drivers from www.asio4all.com. In the audio input device and audio output device choosers, select the actual interface you are using. The input/output configuration button lets you choose which of your interface audio input/output will be available for live to use. It may look different depending on the number of input/output ports your interface actually has.
If you have a basic audio interface with two inputs and two outputs, these would be automatically selected in live. If your interface has more audio inputs and outputs, then you can choose these as necessary. Using the chooser menu, you can increase the quality to higher settings depending on the audio interface you are using. Set the buffer size to 512 samples to determine how much time passes between pressing a key on your midi controller and actually hearing the sounds from your speakers. You can further optimize the buffer size by lowering your settings. You can do this by opening the control panel of your interface if you are using a PC.
_
![]()
- SETTING UP A MIDI CONTROLLER. – Ableton Live Tutorial –
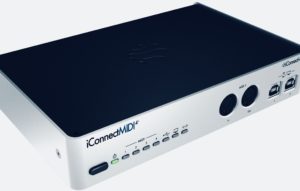 Before you can do this, you have to download and install the latest driver for your midi controller and If necessary, restart live or your computer to complete the installation process. To connect your midi controller, plug the square side of your USB cable into the controller and the other side into a USB port on your computer. Your controller might get the power it need just by connecting it to the computer’s USB port, but if your controller does not do that, you need to connect it to a power source and then turn it on.
Now launch live. Most midi controllers will begin to work automatically as soon as life detects them without requiring any configuration on your part. You can check this by playing the controller and seeing the yellow flashing square in the upper right-hand corner. This means that your controller is ready to play instruments in real time. If your controller doesn’t work automatically or you will like to change the settings, go to live preferences from the menu or use the shortcut ‘Ctrl+,’ on a PC and ‘Cmd+,’ on a Mac book and click the midi sync tap. You should see one or more input, output entry for your controller in the midi port section. To play instruments, make sure that the track switch is set to ‘on’ in your controller’s input port.
Live supports many different control surfaces with instant mappings. These natively supported control surfaces automatically adjust live built-in devices and reassign themselves when you select the new live device. If your controller supports instant mappings, this will work automatically as soon as life detects it. Instant mapping functionality also varies depending on the controller. For example, with the MPK25, every time a track is selected, it records the instantly mapped to 8 knobs. The hand icon on the title bar of the device shows that your control surface currently controls it. If for some reason instant mapping is not working with your midi controller, go back to the midi sync tab in preferences and click on the drop-down menu in the control surface column. Choose your control surface and select the midi port it is connected to.
Finally, you may own a midi controller that may not support instant mappings, or you just may want to set up custom controls for your live set. For this, go to the midi sync tab in preferences. This time, make sure remote is enabled for your controller’s input port. You can now control almost any parameter in line with your controller. To do so, click the midi switch in the upper right-hand corner. Click on the setting you would like to control and move the desired knob on your control surface. Finally click the midi switch again. By now I am sure you can comfortably work on your DAW with your midi controller.
![]()
- RECORDING YOUR AUDIO: Ableton Live Tutorial
 Recording sound into Ableton Live is pretty straight forward. Before you get started, make sure that your audio interface is all set and ready to go. You will start by creating a new live set. Go to the file menu and select the new set or use the shortcut ‘Ctrl + n’ on windows or ‘Cmd + n’ on a Mac. In Ableton live, there are two views for recording audio. The session view and the arrangement view which can be toggled with the tab key. In using the session view, connect your instrument or microphone to your audio interface using the correct type of audio cable. Take a look at the in/out session of one audio which is where you tell each track to look for an incoming audio signal. If you are using a guitar which is mono, you only need to select one mono input to record. To view the in/out session, click on the right-hand corner.
To prepare the track for recording, click the arm button and set the monitor switch to auto so that the track’s input plays through live’s output. Adjust the input gain on your audio interface. You may be hearing a delay from when you play an instrument to when you hear the audio buffer result in live. This is called ‘latency’. To correct this, go to live’s preferences by hitting ‘Ctrl +,’ on your PC and ‘Cmd +,’ on your Mac. In the audio tab, you can make the buffer size smaller.
You can also enable the metronome so you can record along to a clip track. Set a ‘1 Bar’ count-in, do this in the pull-down menu to the right of the metronome switch. To begin recording, click the record button and when you are done, press it again to play the clip.
![]()
- WORKING WITH SESSION VIEW: – Ableton Live Tutorial –
 Understanding the session view is very essential to gaining the most out of Ableton Live. In using the session view for creation, improvisation, live performance and DJ. To do this jus simply press the tab key. You can think the session view as a palette for experimenting and combining musical ideas. These ideas can be midi or audio clips, sound effects or even the whole songs. Session view is a traditional sequencer but more of a sketch pad for creative ideas or a performance tour.
In the session view, you can work with clips which are contained in audio or midi. You can create clips by dragging audio or midi files into the session view from your browser or by recording your own. Every clip has its launch button which starts the clip. You do not need to be precise as launch clips won’t start playing until the beginning of the next one and they are still in sync. Launching a clip stops the previously playing clip on the same track. To stop a clip, click one of the squares ‘clip stop button’ on its track. To stop all clips, click the ‘stop all clips’ button on the screen.
If you want to simultaneously launch a row of clips which is called a sine, click the far right corner. The session view also offers volume and panic controls for each track. If you want to add an effect to a track, it is easy as dragging the effect onto a track from Live’s browser, or you can put an audio effect on a return track and send the desired track audio signal to it. The session view is where you can improvise and play with musical ideas without worrying about songs structure or linear time. Now you get the basics of working with session view.
![]()
- EXPORTING AUDIO AND VIDEO: – Ableton Live Tutorial –
 Once you have finished a song using Ableton Live, you may want to create a file to burn onto CD. Or you may need to upload your finished product to the internet or bring it to a mastering house. To export video, the arrangement view is where you arrange your songs along the timeline from left to right. When you are finished with the arrangement, select a range of time to render by clicking and dragging. Usually, you will want to render the whole song. It is often a good idea to select past the end of your material, so deriver but delay sounds that can extend beyond the last clip are included in the rendered file.
When in doubt, listen to the end of your song and note when the last sound fades away. Then make your selection from there back to the beginning of your arrangement. To make selection easier, use the shortcut ‘Shift + Home’ on your PC and ‘Fn + Shift + Left – Arrow’ on a Mac to select all the way back from the beginning. Them select from the file menu ‘export audio video’ or use the shortcut ‘Ctrl + Shift + R’ on a PC or ‘Cmd + Shift + R’ on your Mac to begin the exporting process. Depending on your version of live, your window may look different but here are some typical settings. Although normalized may make your track louder, it is not the ideal solution for giving tracks the full finished sound. For this unit to understand compression, limiting and mastering, you can save your song either as wave or AIF which are both high-quality file types.
Note that you cannot render MP3s on live, so you need to use a third party application to create MP3s from your exported material. To upload your exported file directly to sound cloud, enable an option that will launch a helper application that will guide you through the upload. Select a location for the wave or AIF and click save. Then wait as your song renders as it may take a couple of minutes depending on the length and complexity of your song. Now you have presented your song as a sound file on your computer. If you have enabled the sound cloud option after live has rendered your song to a location on your computer, a sound cloud application will launch and guide you through the steps to upload your track to your sound cloud account.
Now you can perfectly export your audio with Ableton Live.
![]()
- GETTING SOUNDS INTO LIVE AND SAMPLER: – Ableton Live Tutorial –
 Using samples can be a great way to create new instruments in live or to use the sound sample as the basis of your track or as an inspiration. Sound samples can come from many different sources such as vinyl records, CDs, instruments or even field recording devices or your mobile phone. This is how you can get these sound sources from your device or instrument into live so that you can play them back using the sampler device. The first thing you have to do is to connect your audio interface to your computer and launch live.
Once you have done this, go to preferences in live and make sure that your audio interface is set up correctly under the tab audio. Make sure you have connected the correct input/output channels of your audio device. Connect whatever sound source you have to your audio interface so that you can record the sounds into live. You can record a passage of music into an audio track in live so that you can edit it in sampler. In the audio in/out section of your audio track, make sure that you have selected the correct input channel from your audio interface and on the track.
Start the recording of the clip by clicking on the record icon and then start your turntable when you are recording any audio from the sound source, try to make sure that the level meter do not go into the red meaning that you are clipping the audio signals. Make sure you have a nice ratio between loudness and headroom so that you can manipulate the sample with volume later if you need to. When recording samples, you are not limited by the actual time limit of the sample, only by the amount of space you have on your hard drive. So feel free to expand to any length of music you want to and see what you can come up with.
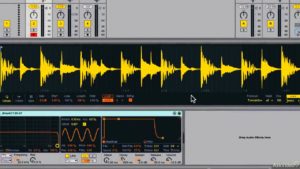
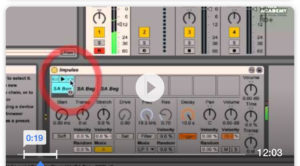
Once you are done recording, stop the clip to end the recording of the audio. Now you have your audio recorded in live. You can put this audio into a sampler so you can edit it quickly and use it for whatever purposes you desire to create a new song. Select a midi track and from your browser, go to instruments and choose a sampler which you will drag and drop into the midi track. You can now take this audio clip and simply drag and drop it into the sampler device. Once it is done, you can see in the display of the sampler device that the sampler has been loaded. The first thing to do after that is to edit the start/end points by clicking on the RI icon to enlarge the display of the sampler device. You can now grab the start/end locators and bring them closer to the point which you wish to play the sample from. You can zoom into the waveform simply by clicking and dragging to make finer adjustments if you need to.
Straightforward right? If you feel there are places that you have missed, take your time and go through the Steps once more. These are the easy steps for a dummy, and it has been thoroughly highlighted in a way to help you achieve your music goals.
I sure hope it has been helpful. Well, I am happy this would help a lot of people in getting started on Ableton Live.
Bonus Ableton Live Tutorial Steps!

OPENING AND GETTING COMFORTABLE WITH THE PROGRAM
 The next step is to open the program. Get comfortable with the controls and features of Ableton Live through reading the provided help manual or accessing tutorials on the program itself. By understanding the help manual provided, you can get acquainted with the program and grow your confidence. It is very pertinent to be thorough so you don’t miss any important detail which you may need later while running the program. Go through the features of Ableton live and know what it requires to run the program successfully. Getting the controls and understanding the features of Ableton live is a great step to achieving your aim. By this stage, I’m certain clarity is coming your way and you are no longer a learner theoretically which is fantastic.
CREATING A TRACK
 Ableton Live Tutorial:
The next step is to create a track. This might sound strange to you but no need to panic because I am here to put you through it!. Now know this, the simple process of finding random samples and adding them to a track the right way will go a long way to help you understand how single tracks are built in Ableton Live.
In doing this, just access different sounds like beats, loops and other samples from available file folders in Ableton Live. One of the first steps to achieving this, i.e., in creating a track is to know precisely how to locate sounds that will populate your files.
Build the track by adding samples according to rhythm and timing conventions. Through a little bit of trial and error, you should become familiar with how to drag-and-drop samples into your track effectively.
For instance, this is what you should do – Select your first sample which could be a drumming sound, for example, anything that works for you is just fine. Moving along and super-fast too, you pick the next sample, for example, a ghost sound to make it a lame drum sound and more interesting too. Now for this second ghost sound, you can cut up a wrap of the velocity and keep it relatively low and still interesting. When you are done selecting the random samples that work for you, you record them together. Play the track and see how far you have come along then you fix the hits.
While fixing the hits, make sure the record coronation is off to make the sounds tight. To make it better, you can cut up a minor beat to a significant melody. So continue with your desired samples, at the end of the day you have successfully created a track on Ableton live. This is getting more interesting right? Well, you are almost there.
ADDING MULTIPLE TRACKS – Ableton Live Tutorial –
 The next step is to add multiple tracks. Now that you have mastered the art of creating an excellent single track, you can use Ableton Live to lay together various tracks on top of each other to get a more multi-functional and complex sound. The idea of adding up all these tracks is a great concept as the result which you will get back, the more complex sounds keep you more in control and give you higher confidence in getting started on Ableton live.
MIXING THE TRACKS
– Ableton Live Tutorial –
This is the next step. After adding multiple tracks, mix the tracks. This should be easy to do since you have become familiar with the basics. I am sure that having a selection of your desired random tracks which you feel represent a full sound project, you will want to use the advanced features of Ableton Live to make the tracks into the best sound combination as much as possible. Well, it is very feasible as Ableton live has these features to offer you.
Features for adding multiple tracks include a lot ranging from a volume or amplitude model which can be found at the bottom of the screen, as well as an individual green dials for each track which are featured prominently in the middle of the screen. It is very prominent and hard to miss so just click on them. Use these to control your various tracks and make your finished project sound better and a lot awesome than when you started.
Additional* – EDITING YOUR TRACKS
– Ableton Live Tutorial –
The next thing to do is just to playback and edit tracks. I am sure you won’t want people to be unhappy with your finished work. All you have to do is to listen attentively while you play back to single out errors in the mix to correct them or make them sound better. The good news is that Ableton live resources for that so use the available Ableton Live resources to crop and manipulate sound to fine-tune your project.
You can listen to it over and over again, diligently and skilfully listen in to get rid of the annoying sound errors and turn your sounds into a subtle blend of tracks. Use the Ableton live audio effects to edit the work. Don’t allow your excellent work to be spoilt by some silly mistakes which could be easily gotten rid of with the Ableton live resources already provided for this purpose. Experts in the field sure know that editing is usually required of virtually every work you do to make it better and presentable to the public. Since you are a beginner, you wouldn’t want your first release to sound bad and weigh down your confidence. So in essence, edit and edit till you are okay with the turnout.
PLAY BACK YOUR ABLETON LIVE TRACK!
– Ableton Live Tutorial –
The last stage to cover is to play your Ableton Live track projects for a live audience. This is the moment we have all been waiting for. You might have a lot of intentions in your mind for your finished work. So if your intended use for it includes playing life, connect your computer to an adequate sound systems and take advantage of the features that Ableton Live provides for live entertaining through sound. You have worked so well, so it is time to enjoy all the efforts you put into the work. For this, it is really important to get that good sound system which will suit your track well. Connect to it and feel the music run through you.
Additional Installations Instructions for Windows or Mac
– Ableton Live Tutorial –
1. INSTALLATION OF THE PROGRAM
Firstly, what you need to do is to install Ableton Live on your computer. Now there are lots of ways you can install this Ableton live software. The installation process will solely depend on your operating system which will aid in installing the program.
Make sure your computer meets the system requirements of the Ableton Live software. It is always a good idea to close or disable any other programs that are running firstly. I am going to give you different ways to install the Ableton live software so you won’t have any problem with whichever way you got it in the first place.
A. INSTALLING FROM A CD WITH AUTORUN FEATURE
When you are installing from a CD with an autorun feature, it automatically starts a setup screen for the software program when inserting the CD, then comfortably follow the steps that appear after entering the disc into your computer.
B. INSTALLING FROM A DOWNLOAD
Again, these days’, people download most of their software. So if you want to install the Ableton live from downloads, these are easy steps to follow:
1. Firstly, download Ableton live from the website or link providing it.
2. When you have downloaded it, open the download folder.
3. If however, the Ableton live file you downloaded is an executable file, double-click the file icon to start the setup process. If the downloaded file is compressed like in a zip format, you must extract the file’s contents before setup can be allowed to begin. Fortunately, this function is built into most versions of Windows so you won’t experience any difficulty with it.
4. Once you have extracted the files from the compressed format, double-click the setup to install.
C. INSTALLING FROM A CD WITHOUT AN AUTORUN FEATURE
Lastly, if you are installing from a CD with no autorun feature, open ‘My Computer.’ Within the My Computer window, open the drive that contains the installation files of Ableton Live. For instance, if the files are on the CD-ROM drive, open the ‘D:’ drive or letter of your CD-ROM drive.
Within the drive that contains your files, locate either the executable setup (i.e. “setup.exe”) or install file. Double-clicking on this file starts the installation process. If you see multiple configurations or install files, try to locate an executable file or double-click each of the setups or install files until you find the file that starts the installation.
While installing, remember to look at all system requirements for Ableton Live. Like many other modern sound programs, this program may include provisions for an advanced sound card, graphics display card or other pieces of hardware, as well as requirements for minimum memory or processing speed. To avoid hitches later, ensure that your computer has what it takes to effectively run Ableton Live.

